
April 10, 2025

It’s highly likely that you will encounter a shelf-life study at some point in your career if you are a sensory professional. On the surface, these studies seem clear cut, but they can quickly unravel once you get into them. Let’s take a closer look at one of our most asked about sensory topics, and dive in to shelf-life!
What is Shelf-Life Testing?
Shelf-life testing is the process of determining how long a product will remain acceptable. The key word in this statement is “acceptable” because it can have a lot of different meanings depending on what you’re dealing with. In general, acceptability will fall in one of the following categories:
- Safety
- Compliance
- Consumer Acceptability
If you’re working in sensory, chances are you’re dealing with consumer acceptability, so we’ll put our focus there. This means that you are determining at what point in time (and under what storage conditions) customers will reject your product at a rate your organization decides is unsatisfactory.
As a sensory program, remember that your job is NOT to decide what is unsatisfactory, but to gather the data needed to make a good decision.
What to Know Before You Get Started
If you take one thing away from this article, let it be this… shelf-life testing is best run as a project, and not as a series of routine tests. You are much better off if you can define a clear objective and understand what “done” looks like.
- Broad Objective: Determine a best buy date for our product
- Clear Objective: Determine the rejection rate of our product over time
It’s also important to know that you can’t get started on this type of project unless you are making a consistent product. Shelf-life testing works because we isolate age and storage conditions as the ONLY contributing factors to change. If other inconsistencies are present from the start, the resulting data won’t be valid.
Selecting and Storing Shelf-Life Samples
If you haven’t started already, build yourself a sample library. Having samples on hand that can be used for unexpected scenarios like troubleshooting, or shelf-life, can really save you in a pinch.
You’ll want to choose samples from batches that pass as true-to-target, label them properly, and store them in a way consistent with how your product is normally stored.
What about force aging products? Long story short, it’s a lot of work to quantify how a forced aged sample of YOUR product equates to a sample aged at normal conditions. So, unless you’ve done that work, it would be guessing.
How to Execute Shelf-Life Testing
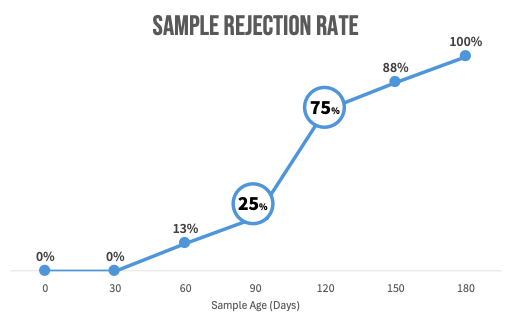
Depending on the resources available and desired accuracy, there are a couple of different ways you can go here. For this example, we want to build a graph of rejection rate over time, so we would use a true-to-target, or “go/no go” test at various aged intervals.
Formal studies will demand you use recruited customers in your target market as your tasters, but we all make do with what we have available to us. If you use an internal panel that typically tastes “fresh” products, make sure to let them know that they are tasting aged samples so they can recalibrate.
How to Analyze Shelf-Life Data
Now that we have rejection rates (failed tests / total tests) for each aged sample, we can plot them on a graph and start our analysis. If your graph looks something like this example, you can point out that there is a clear inflection point where customers start to rapidly reject the product and suggest it as a timeframe for a best buy date.
That’s a Wrap on Shelf-Life
Spending time on a sensory shelf-life study is ultimately an investment in your brand’s reputation and a commitment to your end-customer. If you follow the guidelines above, ask for help when you need it, and do the best you can… you’ll be fine.
DraughtLab offers practical and approachable Sensory Analysis Solutions that deliver real-world value to food and beverage companies. Visit our website or reach out to us at info@draughtlab.com to learn more!
